Hungarian Chocolate Cake Recipe

Hungarian Chocolate Cake

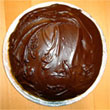
I made a promise to some of my colleagues at Glam that I would bake them a cake and as one of my colleagues is Hungarian I took inspiration from the Hapsburg’s traditional confectionary.  I am not particularly artistic so my efforts are always going to be rustic rather than looking as if it has been picked up at a patisserie but at least it gives it a real homemade feel.  This chocolate cake is a simple chocolate sponge with a mocha buttercream filling and a chocolate and brandy icing topping.  I have made this cake once previously and I made the icing on top a lot thiner so it literally ran off the spoon and covered the whole cake and sides but this time I made it thicker  and piled it on the top.  Depsite the sugar and butter content of the cake, it contains no preservatives or artificial colourings or flavourings and is surprisingly light and not sickly, making it the perfect little treat for your family or friends!

Ingredients

For the cake

125g soft butter or margarine

125g caster superfine sugar

125g self-raising flour (or plain flour plus 1 tsp baking powder)

2 eggs

2 tbsp drinking chocolate

2 tbsp cocoa

1 tbsp cold milk

1 tsp vanilla extract

For the buttercream filling

75g butter

1 egg yolk

175g icing sugar

1 1/2 tbsp cocoa

2 tbsp strong espresso coffee made with 1/1/2 tbsp hot water

1 tsp brandy

1 tsp vanilla extract

For the chocolate icing

125g plain dessert chocolate (70% cocoa solids)

15g butter

2tbsp water

225g sifted icing sugar

1 tsp brandy

1 tsp vanilla extract

Instructions

For the cake

Preheat oven to Gas No. 4 or 180 degrees Celsius

Lightly grease two 7-inch sandwich tins

Put all the ingredients into a bowl

hungarian-choc-cake-2

Beat by mixer or wooden spoon until smooth and creamy

hungarian-choc-cake-3

Divide the mixture between the tins, smooth level with a spatula

Bake the sandwiches for 25 minutes until springy to touch

Allow to cool on a cooling rack

hungarian-choc-cake-4

For the buttercream

Cream the butter until creamy in texture and light in colour

hungarian-choc-cake-5

Beat in the egg yolk

Sift together the sugar and cocoa and beat into the butter alternating with the coffee

Add the brandy and vanilla extract and beat until smooth and easy to spread

hungarian-choc-cake-6

When the two cakes are cool spoon the buttercream spread over the top of one and place the other on top of that

hungarian-choc-cake-7

Place in refrigerator to set the buttercream slightly

For the chocolate icing

Break up the chocolate and place in small thick-bottomed pan with the butter

hungarian-choc-cake-8

Add the water and warm over a gentle heat, stirring with a wooden spoon until a smooth cream is formed

Gradually stir in the icing sugar, adding more water if necessary to achieve the thickness of the icing you desire

hungarian-choc-cake-9

Stir in the brandy and vanilla extract

Hungarian Chocolate Cake

Take cake from refrigerator and ice the top of the cake and sides if desired

Place in refrigerator for 1 hour to set icing

Store in an airtight container in a cool place

Related Images:

Almond Jewish Kipferl Biscuits

This biscuit recipe is one of my tried and tested favourites.  I took a particular interest in Jewish history and Judaism while at school after visiting the Synagogue in Reading.  I studied Religious Studies after school as an extra GCSE and during the year in which we looked at Judaism, Joe Perl and his wife Sylvia who were Holocaust survivors, would come in and tell us about their beliefs and feed us scrumptious food that they would normally eat over festivals or holy days such as the Sabbath.  A year or so after I left school I came across a giant Jewish cookery book.  I’ve used it so much and its dessert recipes are usually good.  This is my adaptation of the traditional Jewish Kipferl biscuits which originated and continue to be popular in the former Austro-Hungarian Empire states.  They make great presents when tied up in some cellophane, and I usually hand them out, somewhat ironically, at Christmas time.  I suppose I should really call them my Hanukkah gifts!

Almond Jewish Kipferl Biscuits

Read more…

Russian Lepeshki Recipe

Russian Lepeshki Biscuits

Baking is something of a guilty/secret pleasure.  I love baking.  I love baking bread.  I absolutely adore baking biscuits.  I seem to manage to surround myself with people who also love baking, those who are able to produce baking perfection.  Why is baking such a guilty pleasure for me?  I’m normally one of those people who likes to throw everything in a pot, stir, serve and eat.  You can’t really do that with baking.  It takes precision.  So don’t tell anyone that I actually quite enjoy the technicality of baking!  It’s just between you and me!

When I came across a recipe for Lepeshki, a Russian biscuit which uses sour cream instead of butter and just knew I had to give the recipe a go.

Ingredients (for about 24 biscuits)

275g self-raising flour

Pinch of salt

90g caster sugar (vanilla sugar if you have it)

1 egg separated

1 egg whisked

120ml sour cream

2 tsp vanilla and almond extract

(You can use less, you can use more, I just really love vanilla and almonds)

1 tbsp milk

50g flaked almonds

Instructions

Preheat oven to 200 degrees Celsius/ 400 degrees Fahrenheit / Gas Mark 6

Sift the flour, salt and sugar into a mixing bowl

Make a well in the centre

lepeshki-2

Whisk one of the eggs and mix with the sour cream, vanilla and almond extracts and milk

lepeshki-3

Add to the dry ingredients to form a soft dough

(I feel I should divulge some information regarding flour at this point.  The original recipes was for 225g of flour, but this made a dough which was so runny there was absolutely no way I was going to be able to roll it out.  I added more by eye and think you probably need 275g of flour instead but as each flour varies, you will have to give it a go and if it becomes too dry you may need to add some extra wet ingredients.  I think the recipe I had was just a bit wrong, but still, use your instinct rather than relying on numbers!)

lepeshki-4

Roll out the dough on a lightly floured surface until about 8mm/ 1/3in thick

(It may be preferable to cool the dough in the fridge before rolling as it becomes warm very quickly and it may be good to roll out sections at a time and keep the remaining in the fridge until you are ready to cut more)

lepeshki-5

Cut the biscuits into rounds with a 7.5cm/3in cutter

Transfer the circles to a lightly oiled baking sheet on a baking tray

Separate the other egg

Brush the biscuits with the egg white

Sprinkle with flaked almonds

lepeshki-6

Bake for 8 to 10 minutes until light golden brown

Transfer to a wire rack to cool

Serve!
Serve!

Store in an airtight container (unless you are feeling particularly piggy and want to devour the lot!)

Related Images: