Georgian Khachupuri Recipe with Sulguni Cheese

I first tried Khachupuri at Mimino, a Georgian restaurant in Kensington.  There are many different types of Khachupuri:

  • Imeritian (Imeruli) circular khachapuri
  • Adjarian (Acharuli/Adjaruli) khachapuri, an open boat shape, topped with a raw egg and a pat of butter before serving
  • Mingrelian (Megruli) khachapuri, similar to Imeritian but with extra cheese on the top
  • Abkhazian (Achma) khachapuri, with multiple layers
  • Ossetian (Ossuri) khachapuri, with a potato and cheese filling
  • Svanuri khachapuri
  • Rachuli khachapuri
  • Phenovani khachapuri

My favourite is the most simple, simply dough, filled with the cheese, topped with another layer of dough and then baked in the oven.  I opted for a combination of smoked and unsmoked Sulguni cheese from the Russian Kalinka shop on Queensway in London.

Ingredients

250ml sour cream

150g melted butter

1 egg lightly whisked

400g plain flour

(this can vary depending on the flour, best to put in small amounts at one time and wait until it comes together)

Pinch of salt

1/4 tsp baking soda

For the filling:

100g smoked and 100g unsmoked sulguni cheeses, grated

1 egg whisked

2 tbsp sour cream

2 cloves of garlic crushed

1 egg yolk for glazing

Instructions

Mix sour cream and melted butter

Add salt and baking soda

Whisk in the egg

Add the sifted flour  slowly

Knead until the dough comes together and is maleable

Divide the dough into two and roll out

For the filling:

Grate the cheese, mix with egg, sour cream and garlic

Place one length of dough on a baking sheet covered with parchment paper

Put the cheese filling on the dough, leaving about 1 cm from the edges

Place second sheet of dough over the top of cheese filling

Use a fork to press edges down, then make a few holes in the top layer of dough to allow steam to escape

Brush with beaten egg yolk to glaze dough

Place in oven for 20 minutes at about 180 degrees Celsius until golden brown

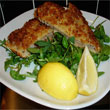
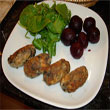
Serve warm with salad garnish as starter or snack

Related Images:

Anything with a breadcrumb…

Veal Escalope!
Veal Escalope!

I am a real advocate of the breadcrumb.  If it wasn’t for the breadcrumb, I’d have never consumed cauliflower.  The first time I tasted cauliflower was in Kranjska Gora.  Mira, the Grandmother, would gently heat florets of cauliflower in some simmering water, then remove them from the water, let them cool, coat them in egg and breadcrumbs and fry.  Perfect!

Kranjska Gora was also the first place I ever tried veal.  Being thirteen the first time I visited (in 1999) I was actually a bit confused as to what veal was.  I am not ashamed to say this.  However, once I tasted it, I knew I would always be a veal lover.  It is not as unkind as most people think due to media campaigns from previous decades.  British veal in particular is very humane and, I’ll have you meat eaters know (cannot argue with the vegetarians and vegans among you, you have morals, I do not) that when you tuck into some lamb, it is actually killed at a younger age than veal.

A popular dish in Slovenia and Croatia, and no doubt other countries of Central and Eastern Europe, is veal escalope in a breadcrumb crust.  This is such an easy dish to make!

Ingredients

Veal escalopes

Plain flour (with seasoning: salt and black pepper)

Beaten eggs

White breadcrumbs

Butter

Olive oil

Instructions

Put plain flour on a plate

Beat eggs and put in bowl

Put breadcrumbs on plate

Make sure veal is sufficiently flat, if not, beat with a meat hammer

Coat veal in plain flour

Dip veal into beaten egg

Dip veal into breadcrumbs

(For best results: double dip!  No nothing to do with British MPs’ expenses!)

Re-dip into beaten egg

Re-dip into breadcrumbs

Heat olive oil and butter in frying pan

Put veal into pan

veal-2

Cook for 2 to 3 minutes on one side

Turn

veal-3

Cook for 2 to 3 minutes maximum

Serve on a bed of watercress, spinach and rocket, drizzled in olive oil, white wine vinegar, salt and black pepper

Add a wedge of lemon for perfect taste!

Serve!
Serve!

Related Images:

Chicken Bitki

This Polish dish reminds me a lot of cevapi in the Balkans but a much lighter version.  Chicken Bitki are like little sausages/meatballs, coated in flour and fried.  In Poland chicken is normally more gamey, so if you can, get cornfed chicken or alternatively, use guinea fowl.  I have never used chicken mince before and was not convinced about the combination with nutmeg and mushrooms, but in fact, they were quite delicious indeed.

bitki-done

Ingredients (to make 12)

15g butter

115g flat, portobello mushrooms, finely chopped

50g white breadcrumbs

350g chicken breast, minced or chopped finely

2 eggs separated

1/4 tsp grated nutmeg

2 tbsp plain flour

3 tbsp oil

Instructions

Melt butter in a pan

Fry mushrooms for 5 minutes until soft

mushrooms

Allow mushrooms to cool and mop up any liquid/butter

Mix breadcrumbs, chicken, egg yolks, nutmeg, salt and pepper and then the mushrooms

bitki-mix

Whisk the egg whites until stiff

Stir half the egg white into the chicken mixture, then fold the remainder

It is not necessary, but I would recommend that you then put the mixture in the refrigerator for 30 minutes as it becomes easier to mold the bitki

Shape the mixture into 12 even long meatballs, 2.5cm wide and 7.5cm long

Roll each bitki in flour

Heat oil in frying pan

Heat the bitki for 10 minutes, turning until evenly golden brown and cooked through

bitki-frying

Serve hot with a green salad and pickled beetroot

Serve!

Serve!

Related Images:

Bulgarian Fried Peppers With Cheese

This is not a quick fix dish, it is a bit of a dinner party piece.  I would suggest making extra so you can pick the ones which look best as it is quite difficult to re-create their structural stability after the skin has been removed.  It’s a great starter though, very tasty, mainly because the creaminess of the feta really complements the warmth of the chili while the parsley refreshes your palette for the next mouthful.

Ingredients (serves 2 -4)

4 peppers (can be red, green or yellow but personally, I think red taste best)

50g plain flour

1 egg, beaten

olive oil for shallow frying

For the filling:

1 egg, beaten

90g feta cheese finely crumbled

2 tbsp fresh parsley

1 small red chili, seeded and chopped

Instructions:

Slit open peppers

Scoop out seeds and core but leave peppers in one piece

Peppers pre-grilling

Carefully open out peppers and place under hot grill (skin side up!)

Peppers under grill

Cook until the skin is charred and blackened

Peppers charred

Place the peppers in a bowl of cold water to prevent them from over-cooking

Leave peppers until cooled and peel off skin

Mix feta, egg, parsley, chili together in a bowl

Feta, egg, parsley, chili

Fill each pepper with mix

Fill peppers

Secure peppers if necessary with wooden cocktail sticks

Dip peppers in seasoned plain flour, then egg, then flour again

Fry the peppers in olive oil for 6-8 minutes, turning once, until golden brown and filling set

Peppers in pan

Drain peppers on kitchen paper before serving

Peppers done! Serve!

Peppers done! Serve!

Related Images:

Friday’s Fish Recipe

Angling is a particularly popular pastime in Russia and as a result, fish is used in many Russian recipes.  This is a great, easy, one-pot, dish, perfect for Friday night dinner after a long week at work.

Ingredients:

600g fish fillets (pike, catfish, perch, or sea fish such as cod or bass)

Juice of 1-2 lemons

750g potatoes

500g mushrooms, preferably wild

30g all-purpose flour

4 eggs

1/2 bunch parsley, dill and scallions (spring onions)

Instructions:

Marinate the fish in lemon juice for 30 minutes.

Boil the potatoes until just soft.

Potatoes

Clean the mushrooms, slice finely, and saute in small knob of butter.

Mushrooms, sliced, sautéed

Cut the fish diagonally.

Coat fish in flour.

Fish fillets in flour

Shallow fry fish in oil until golden brown on both sides (skin side down first).

Fish in pan

Place fried fish fillets in a greased baking dish.

Fish in dish

Slice the potatoes.

Potatoes sliced

Place slices over the fish.

Layer of potatoes

Sprinkle the mushrooms on the top of the potatoes.

Beat the eggs, season with salt and pepper, and pour over the fish and vegetable mixture.

Ready for the oven

Bake in preheated oven at 200ºC until the egg is firm.

Sprinkle with herbs and scallions and serve.

Done!

If you want to make sure you get a good, brown, crispy topping you can add a few small knobs of butter to the topping before putting in the oven.

This traditional Russian dish is quite dry and may please Western palettes more if a little cream or sour cream is drizzled over the fish and potatoes to create a sauce.

Related Images:

The Perfect Canapes: Part 2

When I made blinis lavished with smoked salmon and prawns, I also made some Hungarian stuffed mushrooms (Sonkával töltött gomba).  The woods of the Bakony Mountains in the Transdanubia region, boast an incredible selection of wild mushrooms.  It is estimated that Hungary is home to between 20 and 30 varieties of wild mushrooms and these are regularly used in Hungarian cooking.  However, bizarrely, it is the button mushroom which finds itself most frequently on the menu.

Ingredients:

500g mushrooms

80g butter

100g cooked ham

200 ml milk

4 tbsp flour

2 egg yolks

1 tsp paprika

100g parmesan (or other hard, grated cheese)

Instructions:

Wipe the mushrooms.

Mushrooms

Cut off the stalks.

Grease flameproof dish.

Place mushroom caps in the dish.

Mushrooms, stalks removed, in greased dish

Season with salt and pepper.

Chop up cooked ham.

Chopped ham

Heat the milk.

Melt 40g butter in saucepan.

Butter in saucepan

Stir in the flour (do not let it brown).

Butter & flour

Gradually pour in the hot milk.

Butter, flour, milk

Stir continuously and simmer until the mixture thickens.

When mixture leaves the sides of the pan, add ham.

Butter, flour, milk, ham

Add egg yolks and paprika.

Eggs & Paprika

Mix thoroughly.

Fill mushroom caps.

Filled mushrooms

Sprinkle with cheese.

Drizzle with melted butter.

Ready for the oven

Bake in preheated oven at 200ºC for about 15 minutes.

Serve!

If you have any stuffing mixture left over (as I did), let it cool, put it in the refrigerator and when you fancy a snack, smother on some toasted, grainy, bread, top with grated cheese and grill!

Related Images: